
This page is moving to www.geocities.com/bantamroost/quail/
Last updated on Dec 15, 2001
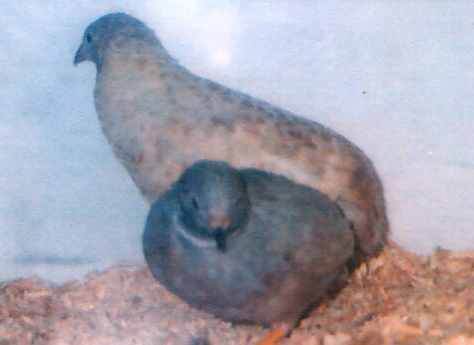
My first introduction to Button Quail was several years ago when I noticed that a friend had a pair that were kept in a cage with some of his other birds. They were normals or wild type. While cute I was not interested in them at that time.
But early in the spring of 1998, while surfing the net I came across several different web sites devoted to The Button Quail. And talk about colors (varieties). Needless to say I became interested. Once I became interested in these little birds I had to do some research. I needed to find out what their requirements are to see if I could meet them, and if I could, I had to find a source for the birds.
During my research I found out that they could not survive our winters, 40 below at times, and that they did the best at normal household temperatures. So ok, they would be house birds. What could I raise and keep them in? Several recommended raising them in a cardboard box. I tried raising chicks in a cardboard box years ago. It was a mess. Them and I were almost thrown out of the house. Then I read that some kept them in aquariums (large fish tanks). I could do that, even had a few aquariums up in the attic. But aquariums are made of glass. Glass is heavy when you are lugging it to the sink to clean. And it breaks in the sink during cleaning. (Past experience from raising tropical fish).
Then I came across a site with directions to build a small brooder/small animal cage from a clear plastic storage bin. (15.5 gallon or 62 quart size) Unlike an aquarium it would not break. It was light. It also came with a lid. This was the way I decided to go, at least until I got them to maturity. But I also made a few modifications on it. 1) I placed the light in a small cardboard box--it was really more like a cardboard tube with the top and bottom removed-- (aprox. 5" wide, 8" long and 10" high), with an opening for the chicks to enter or leave the heated area, much like brooding poultry. 2) With my trusty hot melt glue gun, I glued plastic (silk) plants to the back wall, for hiding places. In bare spots I just set some plants on the floor after bending the stem. I also attached some plants from the wire screen on the cover to hang into the cage. These were held in place by using ties. Again with glue gun in hand I attached 2 test tube water fountains to one end. (opposite end of the small cardboard box). The bottom of the cage was covered with a layer of wood shavings and I was ready to order my eggs.
After seeing the way I made the cages, an other member of our poultry club (Northern N.Y. Poultry Fanciers)also interested in Button Quail made another modification to them. Instead of using wire with nuts and bolts to hold it, he used plastic cloth found in the craft section of stores. He hot melt glued it to the cover, covering the holes for ventilation.
Thanks Dereck ( Raymo's Roost)I had ordered 3 dozen eggs from Randy, (Thanks Randy) and got 40. They arrived on May 09, 1998. I took some pictures but duh --forgot to add the film. After settling for a day, in the incubator they went. At this same time I was also incubating 1 dozen Peking Duck eggs (from John Day) for a friend, and a few Belgian Bearded d'Uccle eggs from an out cross I did.
Because of their small size I left them in the egg carton that they came in, just placing the carton in a tray. ( The incubator is a GQF 1202). I spent the next week worrying about: a) How I was going to get the eggs out of the carton without breaking them and b) How was I going to hatch them as I was worried about the wire in the hatching tray being too large a gauge and the babies would be injured by it.
And then I had a brain storm. I wrapped the carton in a towel and turned it over. The eggs fell out of the carton onto the towel, with not a cracked egg. As for a hatching tray I decided on 2 tops off a egg carton taped together. I used the Styrofoam ones with a sheet of Bounty paper towel folded and fitted to the bottom carton. Guess what. That also worked. On May 27,1997 - 22 chicks hatched and went into the brooder . (The light, a 25 watt red party bulb, was turned on the day the eggs went into the hatching tray.---I read that picking was kept down by using a red light. But I have since started using 15 watt frosted bulbs without any problems.) With water in the water tubes and Game Starter on a plastic margarine dish cover all was waiting for them when they hatched. I also took pics of the chicks in the brooder, but the chicks didn't show up because of the glare. Guess I had better not give up my day job to become a photographer.
This gave me a few weeks as to decide on how I would house them when they reached maturity. A wire cage would not do. I had several cats and the birds are timid. The cats would worry the Quail to death, if they did not break their necks when they attempted to fly straight up. (The so called bonk factor) At present, the quail have not paid any attention to the cats, even when the cats sleep on top of the brooder, or the breeding cages. Thus far I have not had a problem with the birds flying into the cover when startled. They do hit the top at times when they are raising hell, but when startled they generally head for the clumps of plastic plants.
But the 16 quail were growing fast and before I knew it they were starting to become crowded. Because they did so well in the brooder, I decided to stay with the clear plastic storage bins. So a larger plastic storage bin (22.5 gallons or 90 quarts) was converted into a cage for the growing quail, much the same as the one that was used for brooding them. In fact 2 were made. The plan was that one would be for the males and one would be for the females. I would keep them separated until they became sexually mature, and then set them up for breeding. At 3 1/2 weeks the chicks were moved from the brooder to one of the larger cages The plan was that once I was sure of their sexes, I would separate them as males and females. At this time grit and parakeet seed was added to their diet. Greens are also given.
Because the plastic storage bins worked so well, I decided to continue using them. By removing the cardboard box and light, and adding a few more plants, the brooder was converted into a breeding cage. 2 more of the smaller size bins were bought and converted into breeding cages also. And by the time the Buttons were 4 1/2 weeks old they were set up as trios in the breeding cages, and they had changed from quite little chicks to noisy little birds. I never did get a chance to separating the sexes. A little over a week later I started getting my first eggs. Oyster shell was added to the diet once the eggs started arriving. When the birds started laying, they once again became somewhat quite little birdies.
Eggs started coming at about 6 weeks from hatching. At this time I ended up with 3 trios of the Buttons, with each trio in the 15.5 gallon storage bins and the 7 extra males in the 22.5 gallon bin. (Labeled Bachelor's Quarters, or BQ).
Because of the cats I have to carry the cages into the bathroom to remove the birds when cleaning. I then carry the cage to the kitchen for washing and adding litter. I then carry the cages back to the bathroom to return the birds to their home. If a bird gets loose in the house, it may be attacked by a cat.
The clear plastic storage bins have worked very well for cages. They are light weight, easy to clean, cut down drafts, and keep the birds safe and healthy. They worked so well that on August 3, 1998, 3 cinnamon chicks were hatched and placed into a brooder, much like the one that their parents were raised in. The first of the birds from my matings.
I have found that the smaller bin (15.5 gallon) works well for brooding small number of chicks and to house breeding pairs or trios. The larger bin (22.5 gallon) works well for brooding larger batches of chicks, as a cage to hold them to maturity, or for breeding groups larger than 3 birds. All cages have 2 test tube waters mounted to a side of the cage. ( I start out with the glass test tube waters, but once one breaks I replace it with a plastic one. I like the metal clip that comes with the glass model.) This is because they are used both for brooding and breeding, depending on the need. With the hot melt glue the plants can be easily added (for a breeding cage)or removed (to make room for the cardboard brooder)
Because I keep my quail in cages made from modified plastic storage bins, maybe I should call it a "Quail Storage Unit" instead of a cage? Anyway they stack up nicely, with 2X2's being used between the top of the bottom cage and the bottom of the top cage. These spacers allow for an air exchange in each cage. 2 of the larger models will fit on top of 3 of the smaller models or vice a versa, and will fit in a 6 foot X 14 inches area. Being short, I only stack mine 3 high. They are raised off the floor by 2 feet by a simple bench/shelf that we made from 2X4's. Underneath the bench are the kitty pans. Only fair as a cat or two sleep on the quail cages, the quail get to sleep on the cats when they "you know what".
Dick Staie
terowe@northnet.org
Visit our Bantam Page, The Bantam Roost

Click Here to visit
eBirdAuction.com"The Online Bird Auction"
Web Page designed by Terry Towe
![]()

